I love them and it seems that they're really hard-to-find. PERFECT recipe for a DIY project, don't you think??
So it all started when I kept looking at my black frame on my desk...
Please excuse the awesomely yellow Instagram pic. The original is on a different computer.
I LOVE my little easel and frame (the frame is from Target and was around $18), however, I felt like it could benefit from a little gold-cornered action.
So I'm not going to act like this is something ground-breaking or super difficult. I just imagined how I wanted it to turn out, used some Frog Tape (which I usually HATE... Me and painter's tape do not mix), and spray painted that baby.
Well, it involved a little bit more than that.
While this project was pretty easy, it was also kind of stressful... haha. Stressful in that I found you can easily ruin your whole frame with paint if you don't do it correctly.
So first, I removed all the glass and backing from the frame so that it was a totally bare frame. All the ones I used for this are from Target and come apart perfectly exposing just the bare frame itself to make this easy.
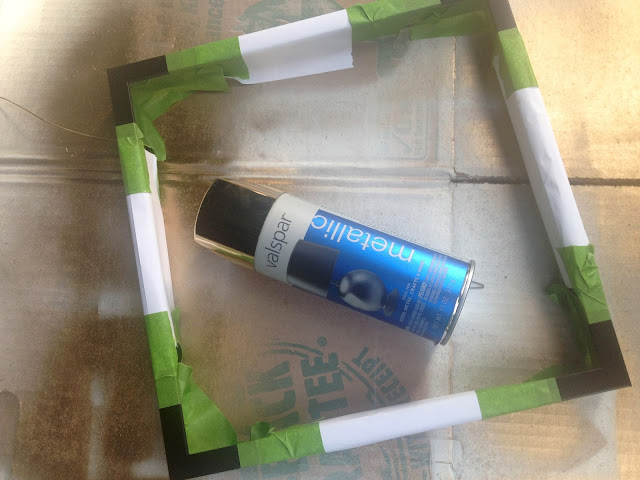
Then, I took my painter's tape (I used Frog Tape) to tape off the sides of the frame exposing the corners you want painted. I totally did not measure the corners, I just eye-balled it and it turned out great!
Here's one of the most important tips... Make sure the tape edges are sealed super well against the frame along the edge where the paint will end. To do this, I just used my nails to sort of scrape the edge of the tape against the frame. Sort of making sure the tape is well-secured to the frame and pressed down really hard.
You definitely have to cover the rest of the frame (the exposed sides) because they will get overspray on them. You could use more tape, or use some scrap paper like I did to cover it. I taped the paper into place.
Then you're ready to paint!
I always paint outside, away from the house, on some scrap cardboard. I really like this particular gold spray paint by Valspar. It covers really smooth and leaves a really shiny and glossy finish.
Then I sprayed a couple quick coats to the corners making sure to get all the edges really well. Before you remove the tape, you need to double check the tops and side edges to make sure you've covered them with paint evenly because it will be really tough to tape it off on the same line perfectly again if you need to touch them up.
Then, I carefully removed the paper covering the sides and peeled away the tape. I could not believe how crisp the lines came out!
...Mostly because I DO NOT trust painter's tape. Even the Frog Tape brand I used, which is supposed to never bleed. Well, it always bleeds. ALWAYS. I never use painter's tape when I paint rooms (around moldings, etc.), just because I find it always takes forever to tape-off the room. Then the results are crappy. So to me, it's not worth it. I can paint pretty crisp lines free-hand in those situations.
But for something like this, you NEED that crisp, perfectly straight edge.
So I was pleasantly surprised.
Here's my re-vamped frame in my office I showed before...
Turned out so pretty right??
This one is my favorite...
I think I may love the print inside it even more though...
You can get it on Etsy here. (and no, that's not sponsored. I just love her shop so much!)
And finally, my little shadow box frame...
Inside is a little painting I've had forever. I never knew just quite how to frame it or what I wanted to do with it. I think it looks presh now... and a little fancy.
All of these frames were purchased at Target between $15 and $18. Not too bad, huh?
I just love how much of an impact the gold corners create. Gives the typical black frames a little something extra.
Now, to resist doing this to every black frame I own. While I love the gold, you could do some seriously fun color combos with more vibrant colors. The possibilities are endless!
What do you guys think? Any simple and fun DIY projects you've tackled lately?


0 comments:
Post a Comment